|
I started my food photography journey in 2018. My earliest images were honestly kinda terrible. I'm not upset about that. I bought a camera and taught myself through trial and error, training my eye, looking at images by people I admire. The way to learn is by making mistakes. LOTS of them. I know that I'm still making "mistakes", even if I don't yet know what they are. I do get compliments on my images all the time, and I find it hard to accept them because I'm constantly striving to be better, and I'm constantly admiring gorgeous images by other food artists. All of this is also, OK.
In the past 4 or 5 years, I have learned a lot, and my photography has improved significantly. I wanted to outline some key lessons I have learned, and perhaps it will make the process a little bit easier for someone else out there who is just getting started. 1. Lighting How it started My very first images were created in a lightbox that I made by myself out of white cardstock and tissue paper. It wasn't very big, and didn't allow for much room to create a scene. My images had weird colour balance, were often a bit washed out from too much light, but it served it's purpose and allowed me to get familiar with a DSLR camera. I just used generic lamps that shone through the tissue paper (paper acts as a diffuser) and lit my subject that way. I'm sure I would be able to use a light box today with more skill than I did when I first started, but I have no interest in trying. The spaghetti aglio e olio with mushrooms pictured below is a recipe that has been on my blog for a long time, the image below I think used to be even worse until I learned to colour correct a bit. There are definitely worse images than this one somewhere haha I just can't find another one at the moment. I'm sure they exist on an SD card somewhere. 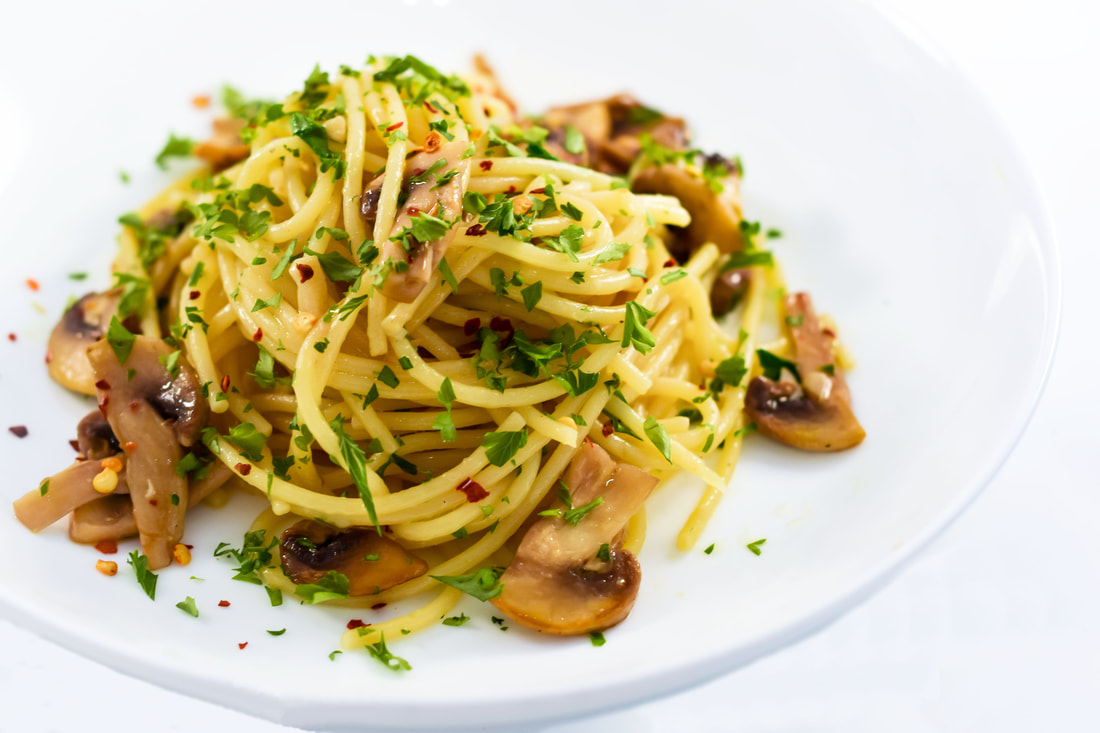
Eventually I decided to invest in an inexpensive lighting system just on Amazon. I'm honestly probably due for an upgrade, but I will undoubtedly hang on to what I have as long as possible. The set below is pretty much identical to what I have. These lights and an old wooden table situated near a window are two key things that have helped me improve. I use a wooden table because I like that I can use it as is for photographing certain dishes. I also own a few backdrops and use them regularly as well. If you have an ugly table, that's ok, just invest in some backdrops and you'll be good to go.
 How it's going The image below is a more current image of the same recipe. Do I like this image? I do, but it doesn't mean I don't think there is room to improve. Is there an obvious improvement from my lightbox image? I think so! I placed it on my wooden table, and I used the soft box lights. A MISTAKE I MADE FOR A LONG TIME USING THESE LIGHTS. A mistake I made for the longest time is using all three of my lights to light up my scene from all angels. This just washes out your image. A side lit scene or a back lit scene are two approaches that work a lot better. I now tend to really pay attention to how the light is hitting my dish, and I will move the light around until it looks good. You're trying to accomplish depth through shadow and highlights. This is something I still feel like I am learning, but there is a lot of room to play around. How strong your shadows are will affect the final feel of your image. Of course I use adobe lightroom to edit my photos, and have learned a lot of things over the years in that sense too, but it's hard to edit an image to look good if the lighting is terrible. 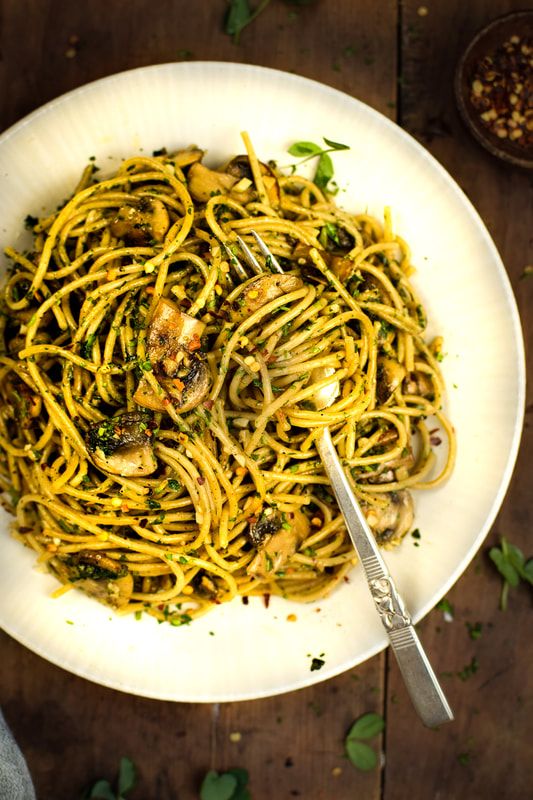
2. Blurred out background
Blurring out the background is an easy way to make whatever your taking a photo of stand out as the focal point. This blurring effect is also known as "Bokeh" and it occurs when your camera lens renders an area to be out of focus. Not every lens will be suitable to make this happen. I'm not an expert on the topic, but I have a 50mm lens and a 35 mm lens that I use frequently for food photography, and they are great choices for achieving this. They both have wide apertures which is what you want. Put your camera in manual mode, and adjust the F/stop up and down to understand the difference, get to know your camera. The lower the F/stop number the stronger the Bokeh effect will be.
Note that the closer you are to your subject, what will be in focus and the focal point of your image will change. If you are using a prime lens like the ones I suggested above (no ability to zoom), you can practice physically moving yourself closer and further away from the subject. Take photos to see the difference between images taken at different distances. The 35 mm linked below is definitely my favourite. It's easier to get overhead shots from a reasonable distance. 
3. Use different heights in overhead shots.
When taking a birds eye view photograph, you can create more dimension by having objects at different heights. I stacked my grilled bread on top of each other, and you can see a flower is blurred at a different height, closer to the lens. This is something I've just started trying to integrate into my photos. It's helpful to have props to work with, which is part of the challenge. I work with what I have laying around my house for now, but I know when I can invest in a few more pieces it will help to apply this concept in my photos.
4. Textured backgrounds
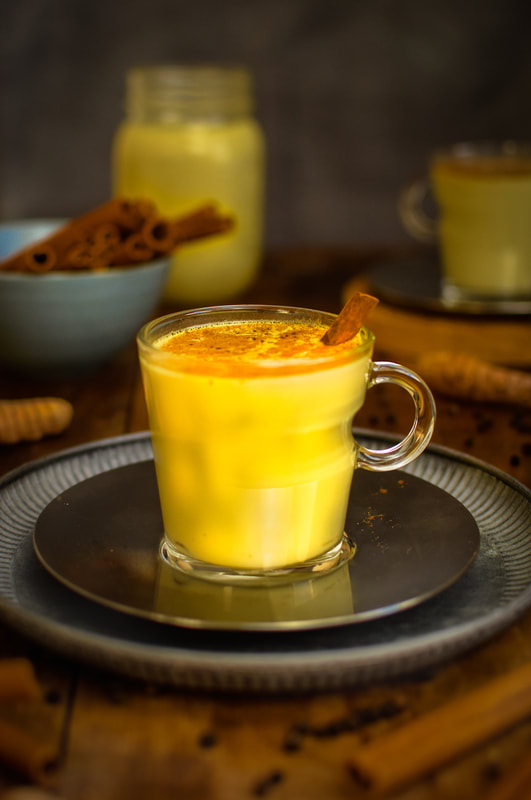
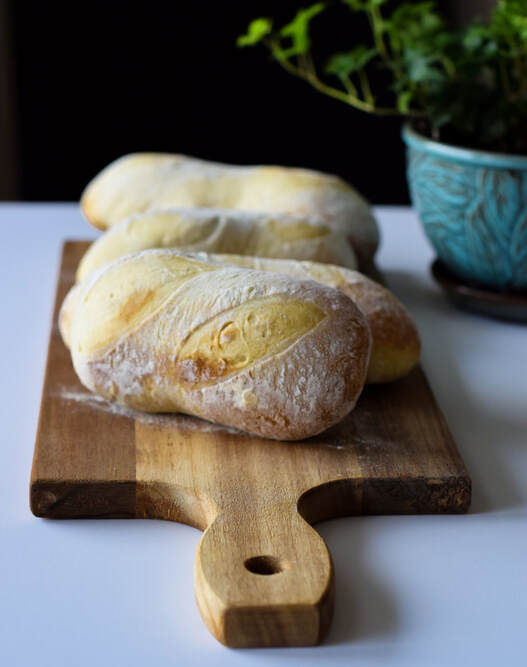
For a long time I just had foam boards from Walmart as background. I had a black one and a white one. They served their purpose for a time. I eventually bought a fabric backdrop from Fodory. Compare the two images above. In the photo of my golden milk, I'm using the fabric background. In the photo of bread, I'm using a black foam board. You should be able to easily see the difference. (not to mention the terrible white balance of the bread photo, this was taken in my early learning stages.) The texture from using the cloth background adds way more depth than something that is flat and solid in colour. I only have a dark grey fabric backdrop at the moment, but again I want to invest in a few more. If you have a space with brick wall, or some kind of paint treatment on your wall that lends texture, that can always work too. I'm in a small apartment and there's nothing too esthetic about it so the fabric trick works for me.
5. Create Movement with "Curves"
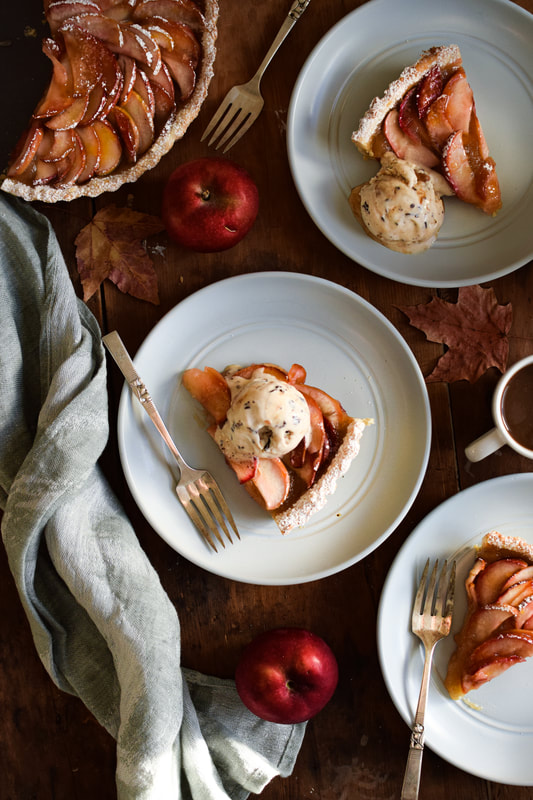
This is a simple way to improve your photo. By creating curves that your eye follows when you look at an image. Instead of placing things in just one vertical line, see how the plates are staggered, where if you were to take a pen and draw a line through the image, you can see where the eye travels. The forks and the linin cloth do the same thing. Practice moving things around on your surface to create "s" and "c" shapes. You can use dishes, herbs, food, linens. This will create a lot more depth and visual interest. Before I use my DSLR, I find it helpful to use my smart phone to look at my scene. I'll snap a few shots with the phone, or just look at my scene using camera mode. I find I can "see" what the overall image will look like better this way since the phone essentially creates a border blocking out unnecessary parts of the room or table that distract my eye. Once it seems closer to what I want, then I will look through my DSLR and snap some photos. I often move things around for 10 solid minutes before I find a configuration that I'm happy with, so give yourself time and room to play. I literally will have like 30 - 50 images on my DSLR and chose 3 that I like for editing and posting.
While I hold my camera in my hands for a lot of images, I use a tripod occasionally too, for photographs and also for creating video that is more cinematic looking than video captured using my phone. Keep in mind a tripod is holding an expensive piece of equipment. I wouldn't buy anything low quality and flimsy and risk it falling and breaking my camera. Manfrotto is definitely one of the most popular brands of tripods used by food photographers that I have come across.
0 Comments
Leave a Reply. |

Author I'm Trisha Archives
May 2024
|

 RSS Feed